If you did not see the previous section of this tutorial, please visit this link.
Understanding the process
Before creating new experiments, let’s first try to understand what happened when we executed this command:
polyaxon run --url=https://raw.githubusercontent.com/polyaxon/polyaxon-quick-start/master/experimentation/simple.yaml -lThe run command
polyaxon run is how the CLI starts new executions of your configuration files, you can also use the UI, the API, or the clients to submit new jobs and experiments.
The run command consumes configuration files, also called Polyaxonfile, from different sources:
- From local files using the
-fflag:polyaxon run -f path/to/polyaxonfile.yamlpolyaxon run -f path/to/polyaxonfile.yaml -f path/to/polyaxonfile_override.yaml
- From local Python files using
--python-moduleor-pmflag:polyaxon run -pm path/to/pythonfile.pyin this case Polyaxon will look for a variablemainwhich will contain your component.polyaxon run -pm path/to/pythonfile.py:component-nameif you have multiple components in your Python file you can specify which one to run.
- From urls using the
--urlflag:polyaxon run --url=https://public-site.com/polyaxonfile.yamlthis is the command that we used to avoid cloning the project locally.
- From a registry
--hubflag:polyaxon run --hub=tensorboard:single-runthis is the command that we used to run the Tensorboard. Oftentimes, components can be reusable and generic, some of these components are distributed in a public registry. Polyaxon also provides a managed registry integrated with our auth, access management, and team management abstraction. Please check the Component Hub docs.
Understanding the Polyaxonfile
Polyaxonfile is a specification that validates the content of Yaml/Python, and partially Golang/Java/Typescript, files to check that they can be compiled and executed by Polyaxon.
Let’s first look at the content of the url:
version: 1.1
kind: component
name: simple-experiment
description: Minimum information to run this TF.Keras example
tags: [examples]
run:
  kind: job
  init:
  - git: {url: "https://github.com/polyaxon/polyaxon-quick-start"}
  container:
    image: polyaxon/polyaxon-quick-start
    command: [python3, "{{ globals.artifacts_path }} + /polyaxon-quick-start/model.py"]
This is a simple Polyaxonfile, the file can be made simpler by removing the optional fields name, description, and tags,
and if the docker image had an entry point, the file would have looked like this:
version: 1.1
kind: component
run:
  kind: job
  container:
    image: polyaxon/polyaxon-quick-start
Every Polyaxonfile must have a kind component or operation. In this section, we will explore the component kind, and in the next part of the tutorial we will dive into the operation kind.
This simple file runs a container with a custom image polyaxon/polyaxon-quick-start, the image is based on Tensorflow, and a command that executes our custom code.
The component also clones the quick start repo, this allows us to change the repo without having to rebuild the docker image,
every time we run this component, Polyaxon will clone the repo and inject it in a context inside our main container.
Please check this section to learn more about initializers
In a nutshell, what Polyaxon provides is a simple way to schedule and run containerized workload.
We will come back to the docker image to learn how to build containers later, for now let’s assume that we have an image with all requirements installed
The Container section
Polyaxon schedules your logic in containers. The container section exposes all information of the Kubernetes container specification.
The container section provides several options, the most important ones are:
- command and args:
Generally when you use the git initializer you will need to provide the path to the git repo in the container:
command: [python3, "{{ globals.artifacts_path }} + /polyaxon-quick-start/model.py"]Or you can use the workingDir:
workingDir: "{{ globals.artifacts_path }} + /polyaxon-quick-start/"
command: [python3, "model.py"]
You can use bash or sh to combine multiple commands:
command: ["/bin/sh","-c"]
args: ["command one; command two && command three"]- Resources:
This is how you assign GPUs:
resources:
  limits:
    nvidia.com/gpu: 1
Or limit the container’s memory and CPU:
resources:
  limits:
    cpu: 500m
    memory: 2000Mi
  requests:
    cpu: 100m
    memory: 50Mi
Training a model
Let’s look now at how Polyaxon logged information and results during the experiment. If you open the file model.py
...

# Polyaxon
tracking.init()
plx_callback = PolyaxonCallback()
log_dir = tracking.get_tensorboard_path()


# TF Model
model = create_model(
    conv1_size=args.conv1_size,
    conv2_size=args.conv2_size,
    dropout=args.dropout,
    hidden1_size=args.hidden1_size,
    conv_activation=args.conv_activation,
    dense_activation=args.dense_activation,
    optimizer=args.optimizer,
    learning_rate=args.learning_rate,
    loss=args.loss,
    num_classes=y_test.shape[1]
)

tensorboard_callback = tf.keras.callbacks.TensorBoard(
    log_dir=log_dir,
    histogram_freq=1,
    update_freq=100
)

model.fit(x=X_train,
          y=y_train,
          epochs=args.epochs,
          validation_data=(X_test, y_test),
          callbacks=[tensorboard_callback, plx_callback])  # Polyaxon
Some parts of the code were removed to reduce the size of the snippet
In this Python file you can see that we are importing some information from polyaxon library.
- We are importing a tracking module
- We are loading a Keras callback
You can also see that this is a simple TF.Keras model and we have a small section where we use the tracking module to track information about the run.
In this case KerasCallback and one line for getting a path for logging Tensorboard’s outputs. Polyaxon will take care of archiving the assets, outputs,
logs to the artifacts store (NFS, S3, GCS, Azure, … that was configured during the deployment) in an async way without impacting your model training.
This module allows Polyaxon to track several information about the experiment, and it also provides a workflow for organizing the outputs and logs. Furthermore, anything tracked by Polyaxon, e.g. artifacts, assets, models … will build a lineage graph so that you can have a full provenance path if you decide to deploy/retire a model to/from production.
This module is optional, Polyaxon logs all your information to whatever artifacts store you configure, you always keep control of the assets you produce.
Start a new experiment
Let’s start a new experiment, we can just run the same command as before. But we might want to change some parameters, e.g. the learning rate or the dropout for instance.
This component does not provide an inputs/outputs definition, so the only way to change the parameters is by changing the Python file and pushing a new commit then starting a new experiment, which is not ideal especially that our program has arguments.
Inputs / Outputs
Instead of changing files and pushing and then starting a new experiment, we can use the inputs and outputs sections to parametrize our program.
Let’s look at the typed file:
version: 1.1
kind: component
name: typed-experiment
description: experiment with inputs
tags: [examples]

inputs:
- {name: conv1_size, type: int, value: 32, isOptional: true}
- {name: conv2_size, type: int, value: 64, isOptional: true}
- {name: dropout, type: float, value: 0.2, isOptional: true}
- {name: hidden1_size, type: int, value: 500, isOptional: true}
- {name: conv_activation, type: str, value: relu, isOptional: true}
- {name: dense_activation, type: str, value: relu, isOptional: true}
- {name: optimizer, type: str, value: adam, isOptional: true}
- {name: learning_rate, type: float, value: 0.001, isOptional: true}
- {name: epochs, type: int}
outputs:
- {name: loss, type: float}
- {name: accuracy, type: float}

run:
  kind: job
  init:
  - git: {url: "https://github.com/polyaxon/polyaxon-quick-start"}
  container:
    image: polyaxon/polyaxon-quick-start
    workingDir: "{{ globals.artifacts_path }}/polyaxon-quick-start"
    command: [python3, model.py]
    args: [
      "--conv1_size={{ conv1_size }}",
      "--conv2_size={{ conv2_size }}",
      "--dropout={{ dropout }}",
      "--hidden1_size={{ hidden1_size }}",
      "--optimizer={{ optimizer }}",
      "--conv_activation={{ conv_activation }}",
      "--dense_activation={{ dense_activation }}",
      "--learning_rate={{ learning_rate }}",
      "--epochs={{ epochs }}"
    ]
The difference between this file and the previous one is that we introduced some inputs/outputs and added arguments to the container.
We also made one input epochs required.
The required input is just for demonstration, if we try to run this component without passing a parameter for the "epochs" input the CLI will raise an error.
We need to pass an epochs param:
polyaxon run --url=https://raw.githubusercontent.com/polyaxon/polyaxon-quick-start/master/experimentation/typed.yaml -P epochs=10 -lThe outputs on the other hand have a delayed validation by default, since we will populate the results during the run.
If you want to validate an output eagerly, you need to set delayValidation: false.
You don’t have to define inputs or outputs and you can still log that information during the run. For instance we defined 2 outputs, but our program will log 4 results (val_loss and val_accuracy as well)
When you run this experiment you will notice that Polyaxon will populate the inputs section in the dashboard automatically.
An important thing to notice is that we use
"--epochs={{ epochs }}"to expose the param to our program/command, this can be exposed as well by using"{{ params.epochs.as_arg }}".
List the operations
Let’s check the list of experiments we’ve created so far:
If you initialized a folder run
polyaxon ops lsOtherwise, you need to run
polyaxon ops ls -p quick-startCheck the logs
If the operation is cached you can run:
polyaxon ops logsThis will return the results for the last operation you executed, otherwise, you need to pass a UUID to get the logs for a specific run:
polyaxon ops logs -p quick-start -uuid UUIDStart another experiment with different params
We can start another run based on the same component, but this time we will pass some more params to modify the default inputs’ values:
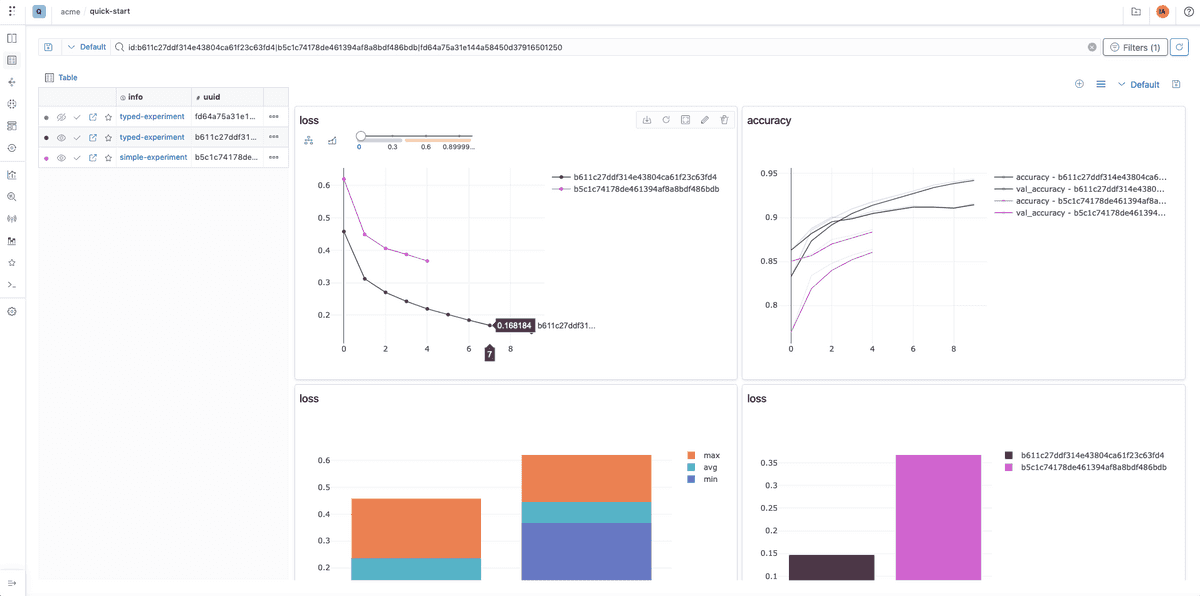
polyaxon run --url=https://raw.githubusercontent.com/polyaxon/polyaxon-quick-start/master/experimentation/typed.yaml -P lr=0.005 -P epochs=8Let’s compare the experiments on the dashboard


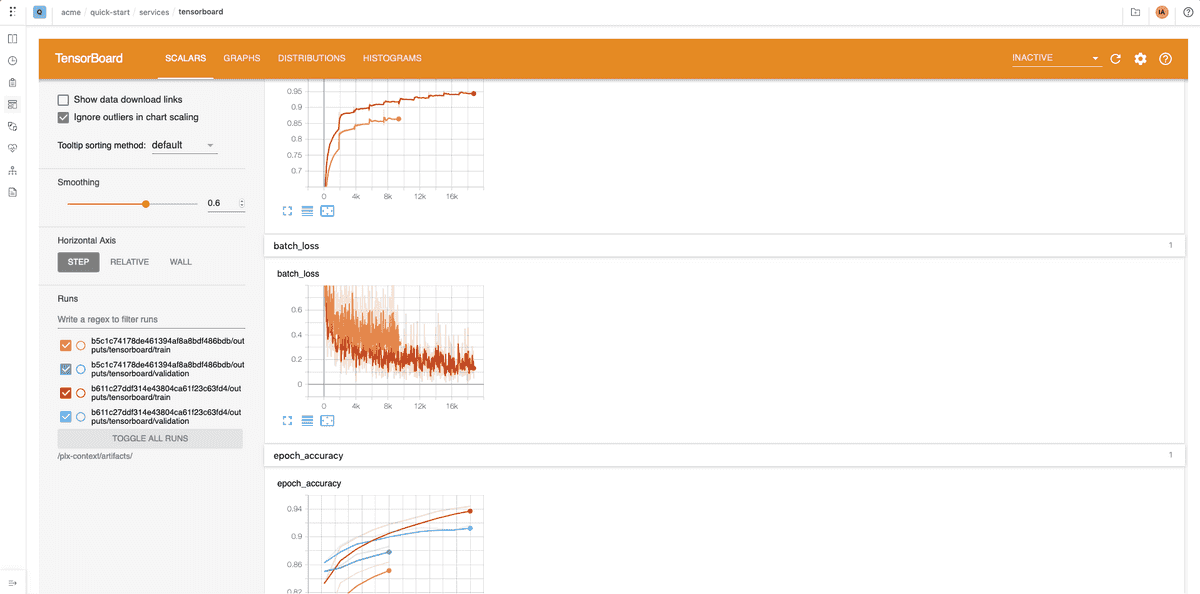
And we can also start a tensorboard for multiple runs:

Congratulations
You made your component more generic and you used parameters to run different versions effortlessly.
In the next section of this tutorial we will explore what happens when we run an experiment or when we pass a param.