Overview
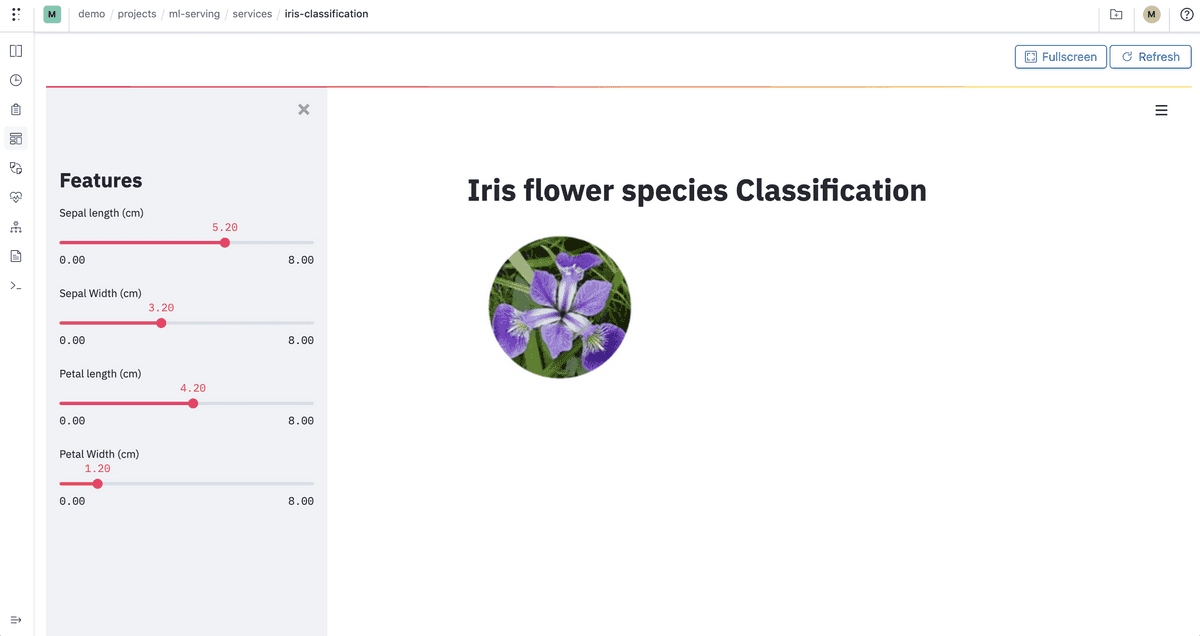
In the previous guide we trained several models. In this section we will learn how to deploy a model as an interactive dashboard. This is an example of creating a parametrized app that you can host using Polyaxon. The same principles in this guides can be used to deploy similar apps using other projects like Dash, Voila, custom front-end service, …
All code and manifests used in this tutorial can be found in this github repo.
Note: On Polyaxon EE or Polyaxon Cloud, the app will be protected and can only be accessed by users who have access to your organization following the permissions defined for each member.
Logged model
In our training script we used Polyaxon to log a model every time we run an experiment:
# Logging the model
tracking.log_model(model_path, name="iris-model", framework="scikit-learn", versioned=False)Note: the
versionedwas removed in version>v1.17and is the default behavior.
Deploying the model
We will deploy a simple streamlit service that will load the best model based on accuracy as an Iris classification App. The app will make predictions based on the features and will display an image corresponding to the flower class.
import streamlit as st
import pandas as pd
import joblib
import argparse

from PIL import Image


def load_model(model_path: str):
    model = open(model_path, "rb")
    return joblib.load(model)


if __name__ == '__main__':
    parser = argparse.ArgumentParser()
    parser.add_argument(
        '--model-path',
        type=str,
    )
    args = parser.parse_args()

    setosa = Image.open("images/iris-setosa.png")
    versicolor = Image.open("images/iris-versicolor.png")
    virginica = Image.open("images/iris-virginica.png")
    classifier = load_model(args.model_path)

    st.title("Iris flower species Classification")
    st.sidebar.title("Features")
    parameter_list = [
        "Sepal length (cm)",
        "Sepal Width (cm)",
        "Petal length (cm)",
        "Petal Width (cm)"
    ]
    sliders = []
    for parameter, parameter_df in zip(parameter_list, ['5.2', '3.2', '4.2', '1.2']):
        values = st.sidebar.slider(
            label=parameter,
            key=parameter,
            value=float(parameter_df),
            min_value=0.0,
            max_value=8.0,
            step=0.1
        )
        sliders.append(values)

    input_variables = pd.DataFrame([sliders], columns=parameter_list)

    prediction = classifier.predict(input_variables)
    if prediction == 0:
        st.image(setosa)
    elif prediction == 1:
        st.image(versicolor)
    else:
        st.image(virginica)
The custom component has a single input, it expects a run uuid, it then loads the model and copy it under the path polyaxon-ml-serving/streamlit-app/model.joblib.
version: 1.1
kind: component
name: iris-classification
tags: ["streamlit", "app"]

inputs:
- name: uuid
  type: str

run:
  kind: service
  ports: [8501]
  rewritePath: true
  init:
  - git: {"url": "https://github.com/polyaxon/polyaxon-ml-serving"}
  - artifacts: {"files": [["{{ uuid }}/outputs/model/model.joblib", "{{ globals.artifacts_path }}/polyaxon-ml-serving/streamlit-app/model.joblib"]]}
  container:
    image: polyaxon/polyaxon-examples:ml-serving
    workingDir: "{{ globals.artifacts_path }}/polyaxon-ml-serving/streamlit-app"
    command: [streamlit, run, app.py]
    args: ["--", "--model-path=./model.joblib"]
To schedule the app with Polyaxon:
polyaxon run -f streamlit-app/polyaxonfile.yaml -P uuid=f8176c9463a345908ce6865c9c7894a9Note that the uuid
f8176c9463a345908ce6865c9c7894a9will be different in your use case.

Saving the custom app in the component hub
By adding more parameters to this app, users can save this component to their private hub and allow users to easily schedule the custom dashboard using the CLI/UI.